
Goal: bring a new KVH edge device online as a working site. When you finish, the site is named, connected to the internet over one or more WAN links with failover, serving its LAN networks, and visible in CommBox Edge Cloud Portal.
Applies to: CommBox EdgeOS 8.x (Konnect) device portal. Where CommBox CoreOS differs, a note at the end of the step gives the CommBox CoreOS menu path.
Time: about 30 minutes for a site with 2–3 WAN links and 3–4 LAN networks.
Before you begin
-
The device is installed and powered on, with at least one WAN link connected (Ethernet, Starlink or cellular).
-
You can sign in to the device portal as an administrator.
-
You have a CommBox Edge Cloud Portal account with access to the customer's organization.
-
You have the site plan:
-
The site name and device name
-
Each WAN link, its provider and the order to use them in
-
Static IP details, if a provider gave you any
-
Each LAN network, with its VLAN ID, subnet and purpose (for example Crew Wi-Fi, Sensors or VoIP)
-
Setup at a glance
-
Name the site and device
-
Configure the WAN interfaces
-
Set WAN priority and failover
-
Create the LAN networks
-
Confirm the internet connection on the device
-
Confirm the site in CommBox Edge Cloud Portal
Step 1: Name the site and device
The site name is how the site appears in CommBox Edge Cloud Portal and in support tickets, so use the name the customer knows it by.
-
Go to System > System Info.
-
Click the edit icon next to Site Name, enter the name and save.
-
Click the edit icon next to Device Name, enter a name for this unit (for example HA-Primary) and save.
-
Note the Device S/N and Firmware Version. You'll need them if you contact support.
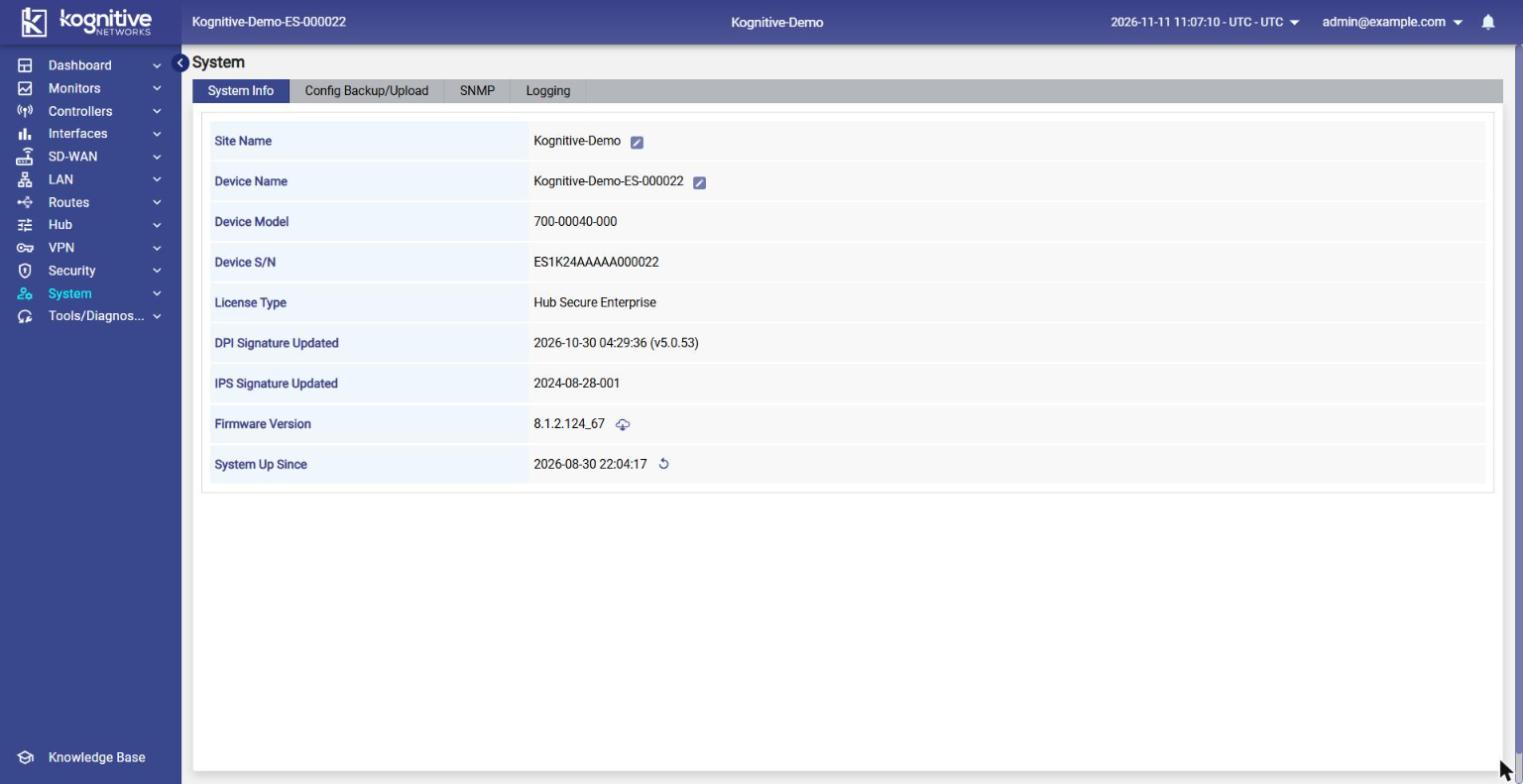
CommBox CoreOS: System > System Info.
Step 2: Configure the WAN interfaces
Each WAN link (an Ethernet ISP, a Starlink terminal or a cellular modem) needs a type, a recognizable alias and, if needed, a static IP.
-
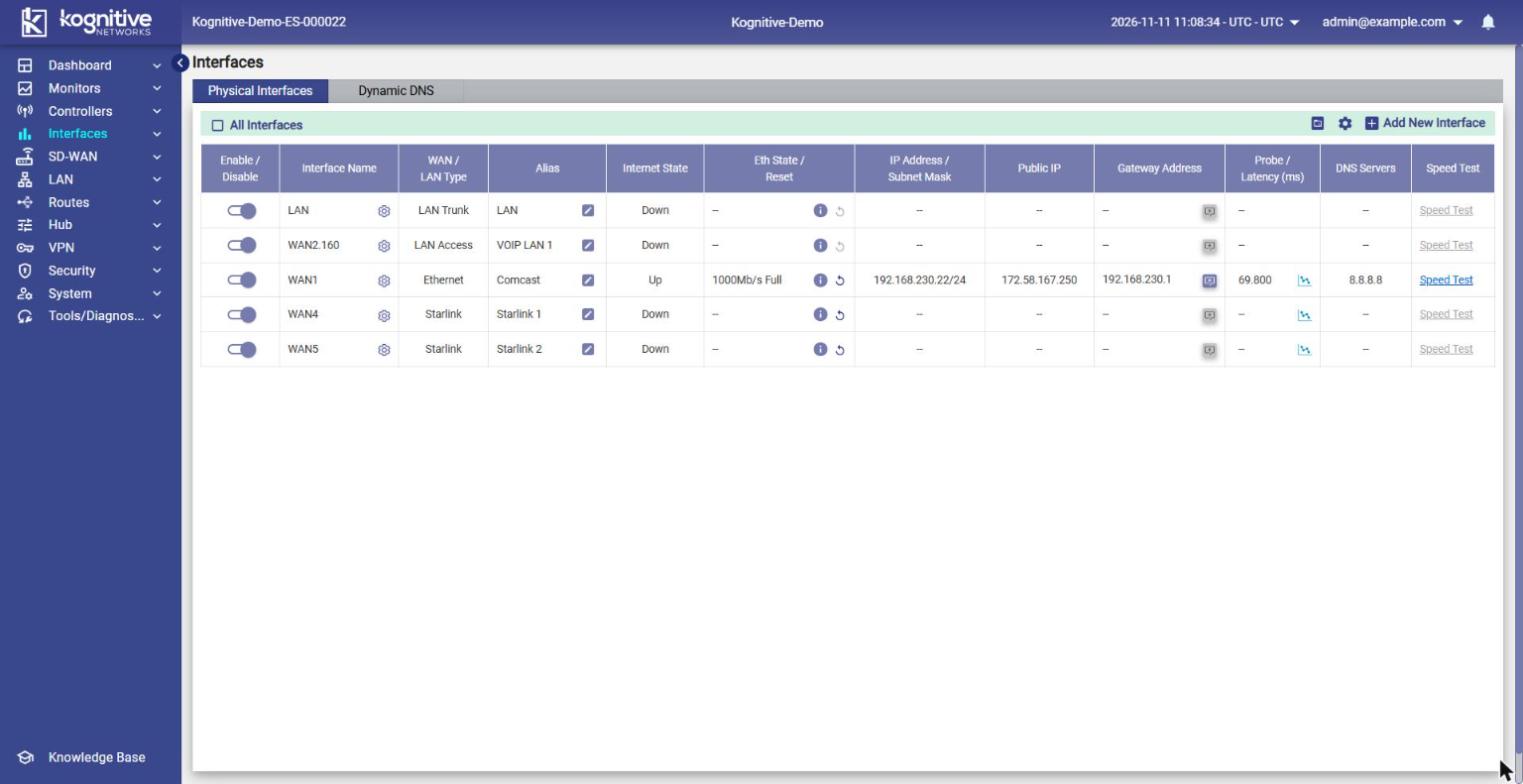
Go to Interfaces > Physical Interfaces. The table lists every port with its WAN/LAN type, alias, internet state, IP address, gateway and probe latency.
-
Turn off the Enable/Disable toggle for the WAN you want to configure. You can only edit an interface's settings while it's disabled.
-
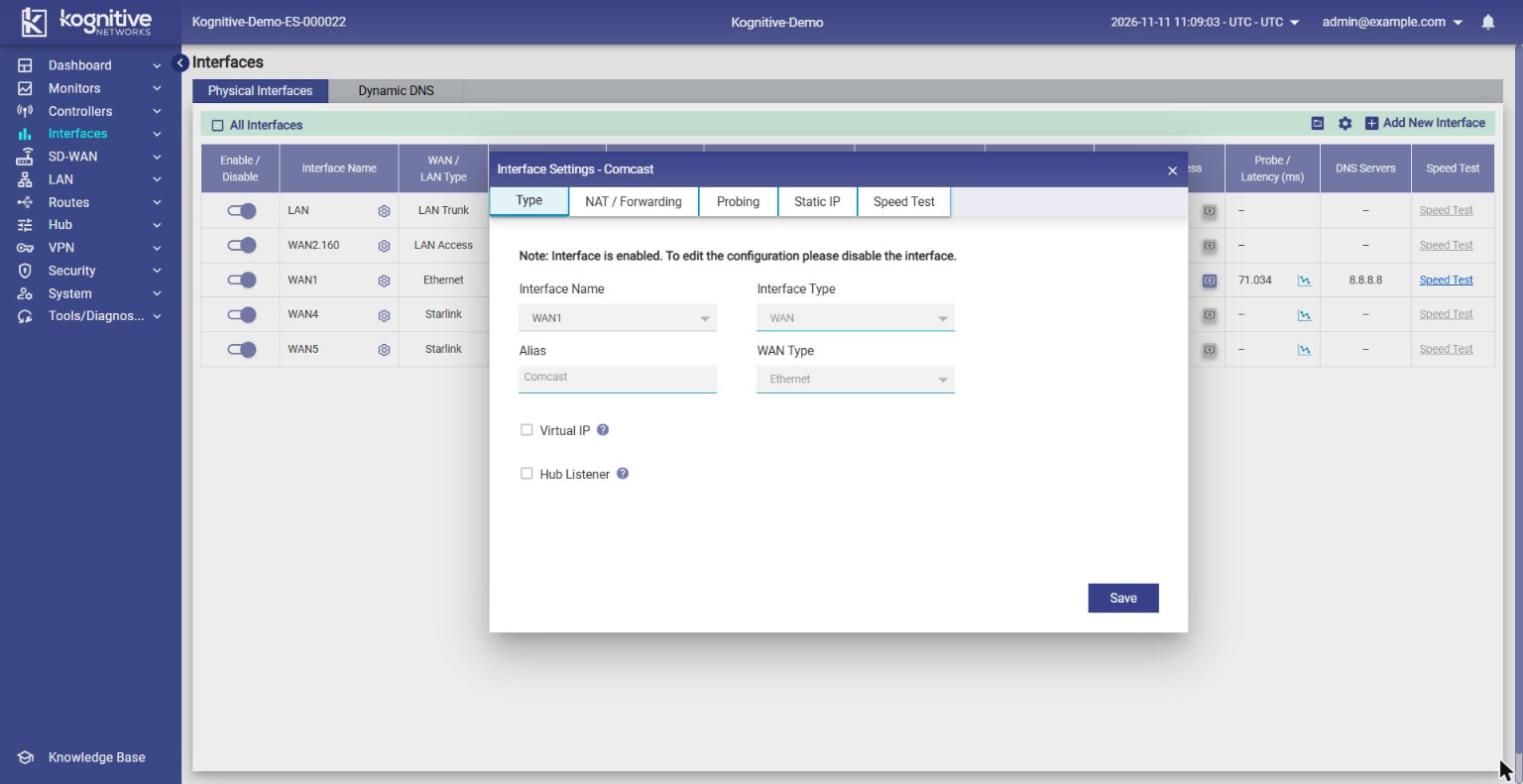
Click the gear icon next to the interface name to open Interface Settings.
-
On the Type tab, check that Interface Type is WAN, choose the WAN Type (for example Ethernet or Starlink), and enter an Alias people will recognize, such as Starlink 1 or the ISP's name.
-
On the Static IP tab, choose Yes only if the provider gave you a static IP, then enter the IP Address/Subnet Mask and Gateway Address. Otherwise leave it on No.
-
On the Probing tab, choose a probing profile. Default Probing is selected unless you change it.
-
Click Save, then turn the interface's toggle back on.
-
Repeat steps 2–7 for each WAN link. If a port isn't in the list, click Add New Interface.
CommBox CoreOS: Interfaces > Interfaces. Use Add Interface for a new port.
Step 3: Set WAN priority and failover
A WAN profile decides which link carries traffic first and which links take over if it fails.
-
Go to SD-WAN > WAN Profiles.
-
Select an existing profile, or click + Profile to create one and give it a Profile Name, for example Failover.
-
Drag each WAN into a priority row: Highest Priority, Priority 2 or Lowest Priority. Traffic uses the highest row that has a working link.
-
Drag any link this profile shouldn't use into Disabled WANs.
-
Set Fall-Through Mode. Hover over its info icon for what each option does.
-
Click Save.
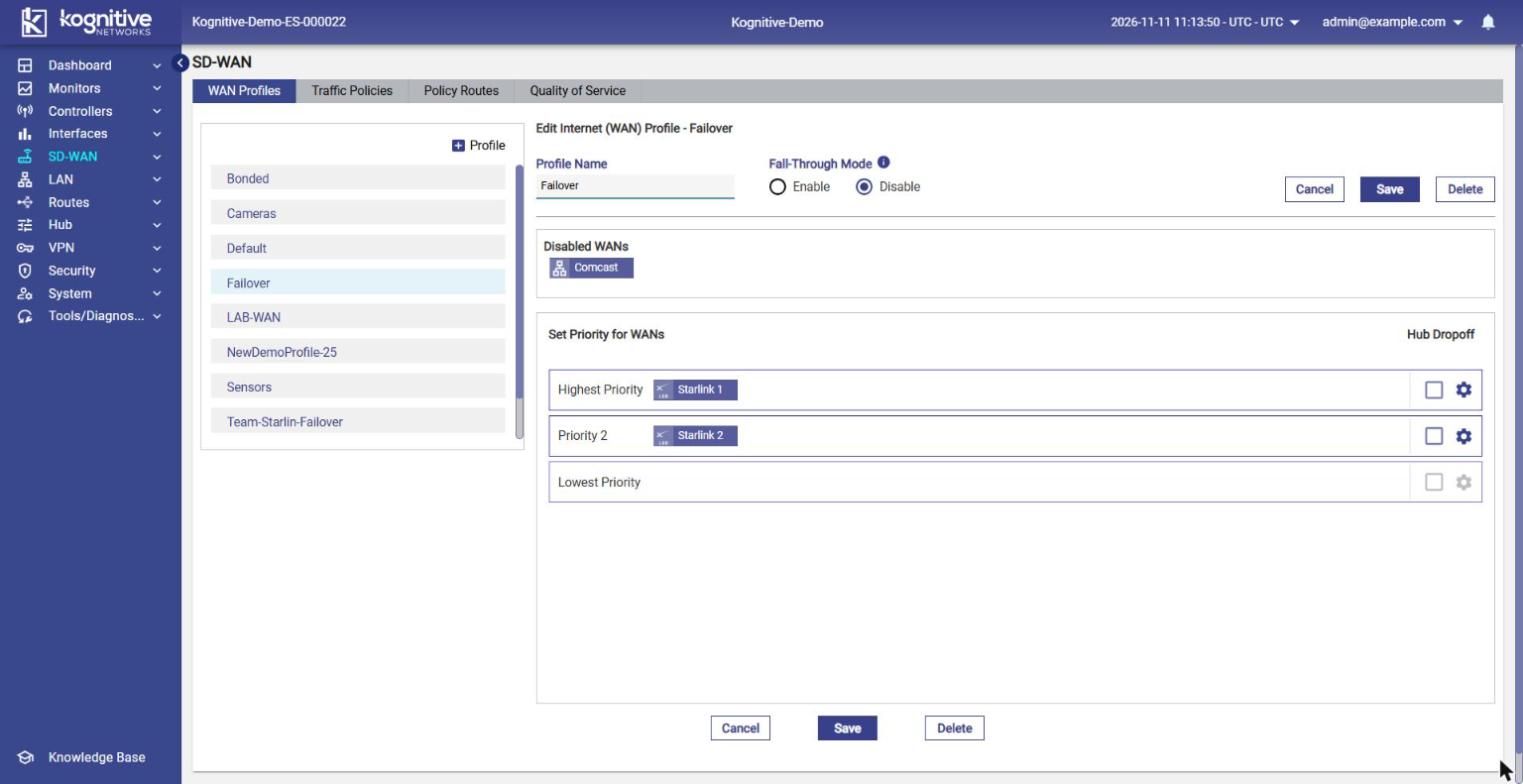
CommBox CoreOS: SD-WAN > Priority list. Links this profile doesn't use appear under Available WANs.
Step 4: Create the LAN networks
Create one connected network for each group of devices on the site, such as crew Wi-Fi, sensors or VoIP.
-
Go to LAN > Access Networks and click Add Connected Network.
-
Enter the Network ID (the VLAN ID, for example 115), a Network Alias (for example Crew-WiFi) and the Interface IP (the gateway address with its subnet, for example 192.168.115.1/24).
-
Set Managed Connected Network to Enable. This shows the WAN profile, traffic policy and DHCP settings.
-
Under WAN Profile and Traffic Policies, select the WAN Profile from Step 3, then set the Network Traffic Policy, Device Traffic Policy and Internet Priority.
-
Under DHCP Settings, keep DHCP enabled so devices get an address automatically. Enter the Default DHCP Gateway IP, DNS Server IP and IP Pools. Add IP Reservations for devices that need a fixed address.
-
For a crew or guest network that needs a login page, set Captive Access Network to Enable.
-
Click Save. Repeat for each network.
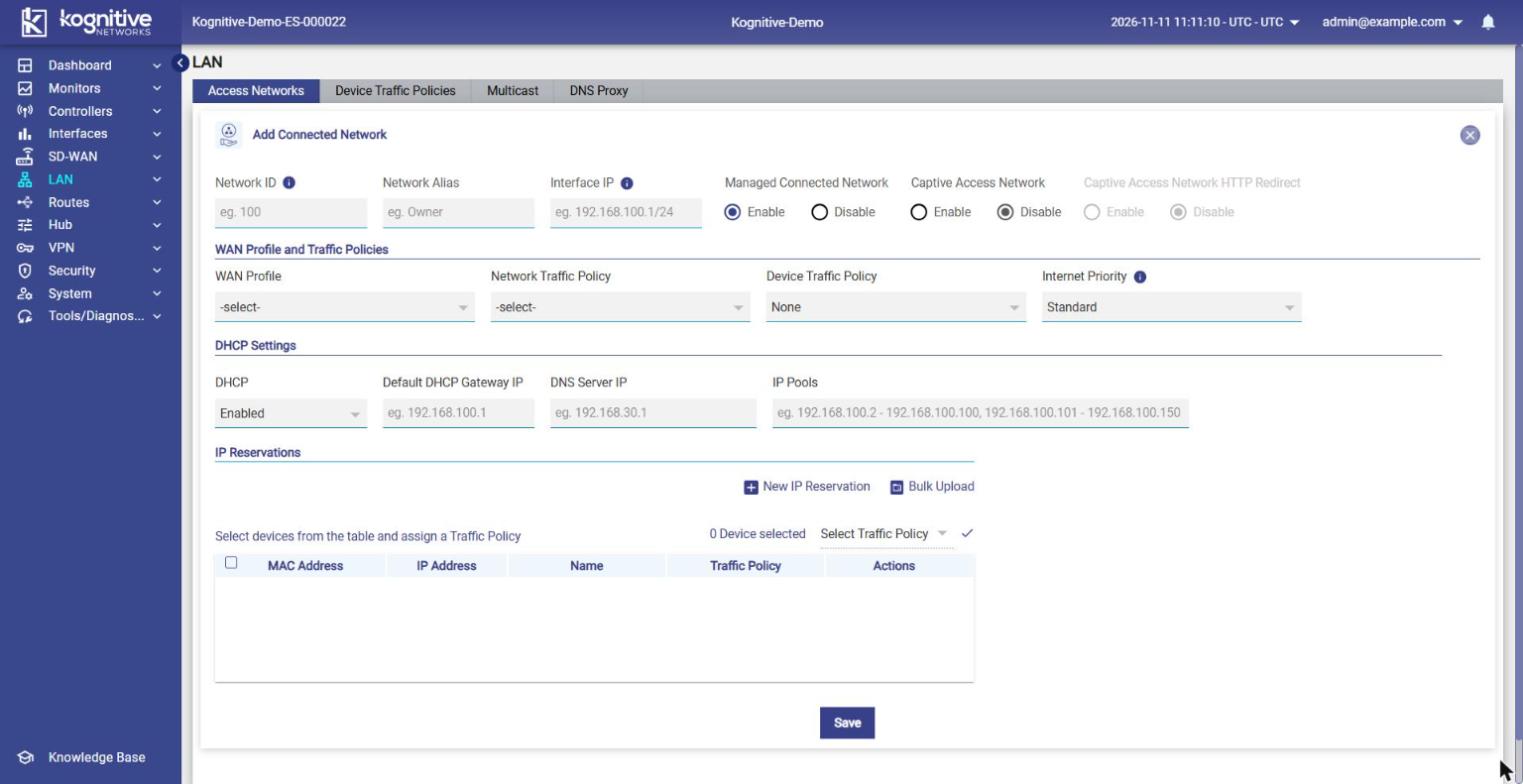
CommBox CoreOS: LAN > Access Networks.
Step 5: Confirm the internet connection on the device
-
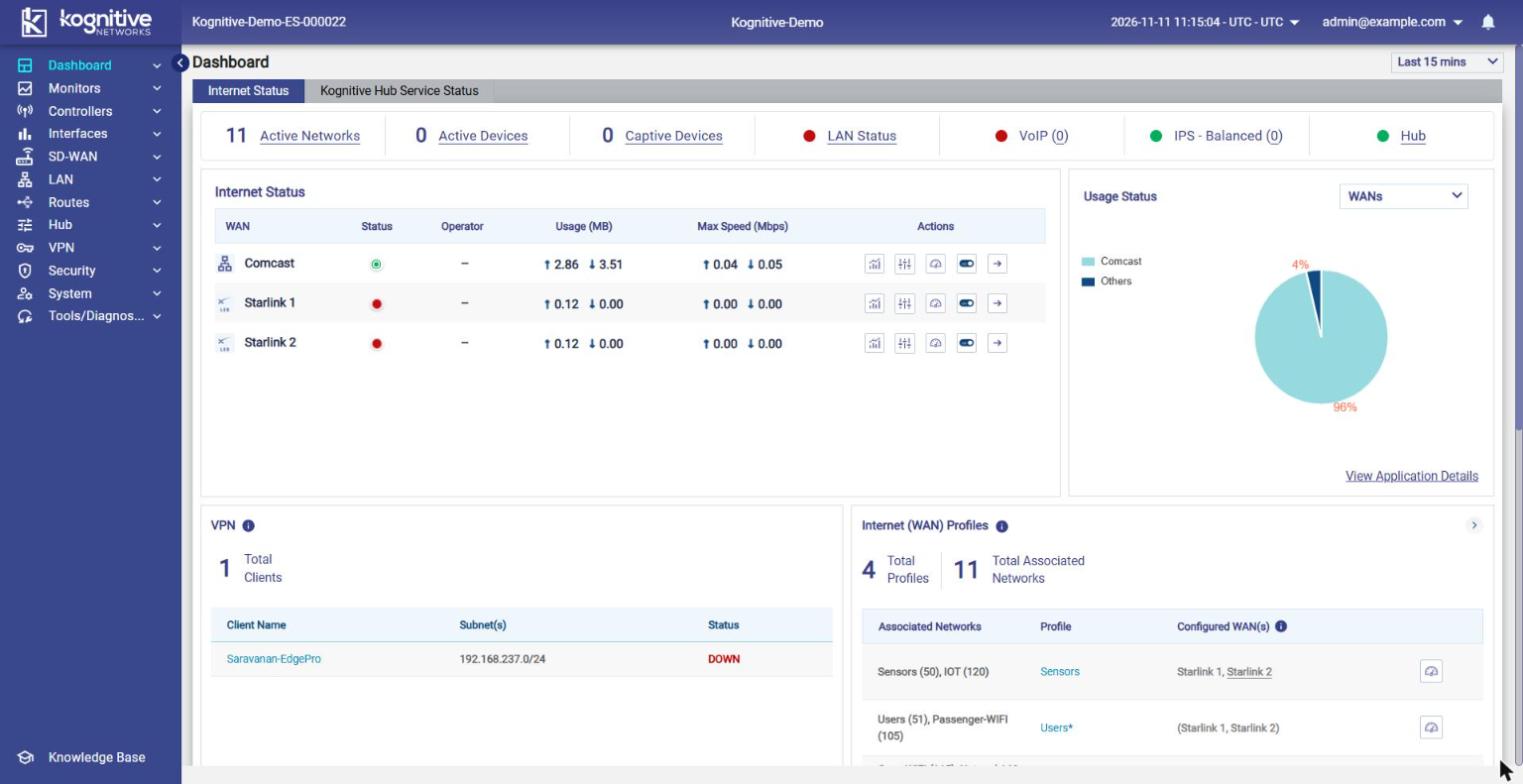
Go to Dashboard > Internet Status. Each WAN should show a green status and usage starting to increase.
-
On Interfaces > Physical Interfaces, check that each WAN's Internet State is Up and shows an IP address, a gateway and a probe latency.
Step 6: Confirm the site in CommBox Edge Cloud Portal
-
Sign in to CommBox Edge Cloud Portal and select the customer's Organization.
-
Go to Sites and search for the site name from Step 1. Check that the site is online and that Location, Usage and Availability are filling in.
[Screenshot to add: CommBox Edge Cloud Portal > Sites, with the site listed and the K4 EDGE logo masked]
-
Go to Inventory > Deployed and check that the device is listed with the right site, device name, DID and a recent Last Seen time.
[Screenshot to add: CommBox Edge Cloud Portal > Inventory > Deployed, showing the device row, with the K4 EDGE logo masked]
If the site doesn't appear, check that the device has internet (Step 5) and that you selected the right organization. If it still doesn't appear, contact KVH Support with the Device S/N from Step 1.
Check that it worked
-
The site and device names are correct in System Info.
-
Every WAN you use shows Up, and the WAN profile lists the links in the right order.
-
A test device on each LAN network gets an IP address and can browse the internet.
-
The site is online in CommBox Edge Cloud Portal, and the device appears under Inventory > Deployed.
Troubleshooting
|
Problem |
Likely cause |
What to do |
|---|---|---|
|
Interface settings are greyed out |
The interface is enabled |
Turn off its toggle on Physical Interfaces, then edit it. |
|
A WAN shows Down |
Cable, modem or terminal issue, or a wrong static IP or gateway |
Check the physical link. Re-check the Static IP tab against the provider's details. |
|
Devices on a LAN don't get an IP |
DHCP is off, or the VLAN ID doesn't match the switch or access point |
Check DHCP Settings on the network. Confirm the Network ID matches the VLAN on the switch. |
|
Traffic doesn't fail over |
The backup link isn't in the network's WAN profile |
Add the link to a priority row in SD-WAN, and check which WAN profile the LAN network uses. |
|
Site not in CommBox Edge Cloud Portal |
Wrong organization selected, or the device has no internet |
Change the organization filter. Fix the WAN connection (Step 5). |
Related pages
-
Physical Interfaces: field reference
-
SD-WAN WAN Profiles: field reference
-
Access Networks: field reference
-
Captive Access Network (CAN) Administration Portal